

Ugly radiators can spoil the entire look of a room. Shop bought radiator covers often don’t fit. Here I will show you how to make a simple radiator cover for very little money. Even someone with limited woodworking skills can make this attractive cover.

The video
There is also an easy to follow Youtube video on my channel to support this article.
Materials
This entire project was made from a small off cut of 18mm MDF for the top and less than half a sheet of 15mm MDF for the rest of the cover. MDF stands for “medium density fibreboard.” MDF is the perfect choice of material for a simple radiator cover because it is very stable. It will take the temperature changes very well. And it is very easy to paint.
Woodworking plans
If you are a keen woodworker or would like to be. Check out this link. http://stsmdiy.tedsplans.hop.clickbank.net/?tid=tracking
Efficiency
A well designed radiator cover can actually improve the efficiency of a radiator. In order for a radiator cover to work efficiently. Without stopping the heat coming from the radiator. It must have the correct vents. The vents I put in all my radiator covers are; 100mm at the bottom and 30mm at the top. I find this a good ratio. A lot of cold air is sucked in at the bottom. The air is then heated and forced out into the room through the 30mm top vent.
Measuring the radiator
When measuring up for a radiator cover there are three measurements you need.
- Valve to valve across the front of the radiator.
- Height to the top of the radiator from the floor.
- How far from the wall is the front of the radiator.

Allowance added to measurements
- Valve to valve plus about 25mm each side. So the measurement between valves plus 50mm
- Height from the floor to the top of the radiator plus about 30mm clearance.
- Distance from wall to the furthermost part of the radiator plus about 20mm

Making a cutting list
Now that I have my measurements I can make a cutting list for all the pieces I need. The 2 side panels will be. Width = the measurement from the wall to the furthermost point of the radiator plus 20mm. Length = height of radiator plus 30mm clearance. The 2 frame side pieces or stiles will be. Width = 100mm. Length = height of radiator plus 30mm clearance. The 2 frame top and bottom pieces or the rails will be. Width = 100mm. Length = Valve to valve measurement plus 50mm clearance plus thickness of 2 side panels 30mm minus width of the 2 stiles 200mm. The top with 15mm overhang on front and sides. Width = width of side panel plus thickness of front frame 15mm plus 15mm overhang. Length = length of rail plus width of 2 stiles 200mm plus 30mm for the overhang on both sides.
Remember the golden rule of measure twice, cut once!!!!
I like to write my cutting lists out like this

How to cut
In the video I cut up the MDF with an industrial wall saw but you could ask at the DIY store for them to cut the pieces for you. Alternatively you could cut them with a circular saw or a table saw if you have one.
Be sure when cutting MDF you take precautions. The dust created when cutting MDF can be harmful. So make sure you use suitable dust extraction and/or a dust mask.
The front frame of the radiator cover is made up of 4 pieces. All of which are 100mm wide.

Marking out
I start off by putting a face mark on each piece of the front frame. And marking top, bottom, left and right so I can’t get them mixed up.
Then I mark out on the left and right pieces 30mm at the top and 100mm at the bottom. This is where the top and bottom rails go to create the vents.

Chamfering
The front frame pieces all have a chamfer detail on them. A chamfer is cutting the corner off at a 45 degree angle. It is best cut with a router. Even better if the router is mounted in a router table. So I mark where each chamfer will be. This way I won’t make a mistake when I take them to the router table and cut the chamfers. The stiles get chamfered on the 2 long sides. The rails get chamfered on all 4 sides. And the top gets chamfered on 1 long side and the 2 short sides.

Joining the pieces together
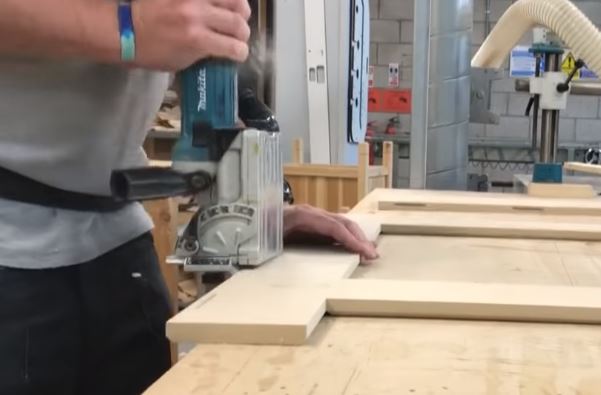
I use biscuit joints to join the front frame together. To position them I mark the centre of the end of the rails. Put the rails in position against the stiles and transfer the mark across. I set the biscuit jointer up for a no.20 biscuit. And I adjust the fence so the biscuit slot will be low enough not to interfere with the chamfers.
Gluing up
I use 2 sash clamps to glue up the front frame. I get everything set out “dry” (without glue) so when I put the glue on everything should go smoothly. The clamps want to be positioned in the centre of the rails. This ensures the clamping pressure is applied to the right place.
I put a little ‘splodge’ of glue in each of the biscuit slots and a little on the ends of the rails. Not too much otherwise you will just be wiping it off everything. The glue I’m using is “Titebond 2” and it is my go to glue now for most woodworking tasks. Here is an Amazon affiliate link to it.
When the glue and biscuits are in all the slots I put the pieces together. I make sure all my marks are aligned. I then tighten the clamps. When tightening the clamps I only need enough pressure to bring the joint together. Excess pressure could cause the rails to bow and distort.
Squaring the frame up
Now that the frame is clamped I measure the diagonals to make sure the frame is square. If the diagonal measurements are equal then it is square. If the measurements aren’t equal then the clamps will need adjusting until it’s square.

Attaching the sides
When the glue is dry on the front frame after an hour or so. The clamps can be removed to work on it but the glue won’t be fully dry for about 24 hours. The side panels can now be attached. For something this length I use 4 biscuits. I put 4 marks evenly spaced out along the side panels. Then transfer these marks to the back of the front frame which is now face down.
The biscuit slots in the side panels are cut first. When I come to cut the biscuit slots in the back of the frame. I move the fence back by 2mm. This makes the end panel deliberately stepped in so if the joint is out slightly it won’t be noticeable.
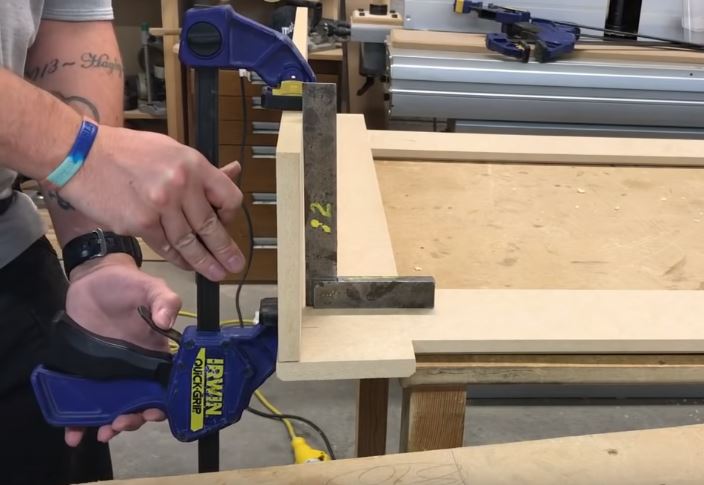
Again I put glue and biscuits in the slots and along the edge and clamp the side panels on. Making sure they are square to the front frame. I use quick grip clamps for this and an engineers square.
Attaching the top
To attach the top. I simply screw on some metal angle brackets. 2 brackets on the front frame and 2 on the side panels is enough for this size cover. I also put 2 angle brackets at the back of the top so later on I can screw it back to the wall.

The grill
The last job is to put on the grill bought from B&Q. I measure the opening in the front frame and add about 50mm to these measurements. This gives me something to screw through to attach the grill. I cut the grill on the wall saw for speed but they are really easy to cut even with a handsaw. I then use 15mm screws spaced about 120mm apart to screw the grill on to the backside of the front frame.

So that’s How to make a simple radiator cover. In another article I will show you how I fitted this cover. Scribing it over the skirting boards and screwing it back to the wall.
Thanks for reading and watching
I hope this article helps you with your project. If it has then please leave me a comment and let me know how you get on. Be sure to watch my Youtube video that accompanies this article and remember to Like, share and subscribe to help the channel grow. You can follow me and our house on Facebook and Instagram for the latest projects on our renovation or my latest DIY tips.
Making videos and blogs to help others improve their DIY skills takes a lot of time and can also cost a lot of money. If you would like to make a donation to help the channel and website grow, develop and improve it would be greatly appreciated and put to good use. Just follow the Paypal link below. Thank you in advance.
https://www.paypal.me/spendtimesavemoney
Other articles http://spendtimesavemoney.com/index.php/2020/01/19/how-to-cut-an-external-mitre-outside-corner-on-skirting-boards-baseboards/
Excellent article. I certainly appreciate this site. Continue the good work!